How to set up mirror booth graphics in Darkroom Booth Software
1. You will need videos. Depending on how many photos you want to take and what comments you will need between 10 to 14 in most cases if you are doing 3 to 4 photos. For best results they should have a black background so the images appears to “float” in the mirror. These can be created in several ways such as with Adobe After Effects but you can also find video artist that can create these for you.
2. Create a screen template that is also black and has a single text box with %text% with the text color black. This will let only the videos show with no other text on screen.
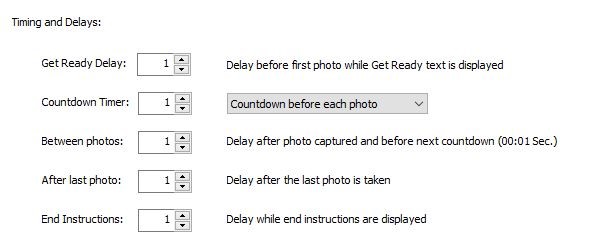
3. Set all of the basic timing in the TIming tab to 1 sec. You can adjust this to more if you want more blank screen time between videos but this is a starting point that works well in most cases. (see screen shot 1 below)
4. Turn off Live view in the Live view tab. The mirror will be your live view. You will need a 2 way mirror with the monitor and camera behind that and all of it enclosed so it is dark inside. This will give the appearance of the videos coming from inside the mirror. You can get really fancy and use an expensive “touch sensitive” mirror so the user can touch the screen to start or just a basic 2 way mirror and use a separate arcade button or Booth Control to start the session.
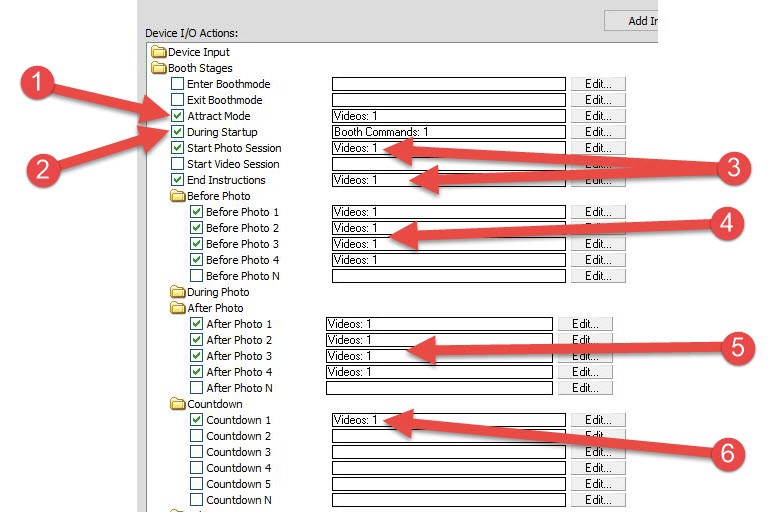
5. Now add your videos in the Device control section. (See screen shot 2 below.)
1. The Attract Mode video. This is set to looping and will give some info while the booth is not in use.
2. If you are using a touch sensitive mirror add a Booth Command here for “Start Session” this will allow the single touch on the screen to end the Attract video and start the session
3. Start session and End instruction video go here. Theses can be to tell them how many photo will be taken and that the session is over and the photos are printing.
4. Add videos here that will let them know the next photo is coming like “get ready for photo 1”, etc..
5. Here you can add videos that can say something about the photo just taken like “Great Job!”, etc..
6. Finally, you can add a countdown video here. Just add one and it will play prior to each photo. You could also use a traditional countdown in the screen template as well.
That’s it, with a little imagination you can customize the videos by theme. For example, you could have a vampire in the videos for Halloween or a princess for a little girls birthday party. Imagine a corporate event where the CEO appears in the mirror saying “You can do better than that on the next photo.” Happy boothing!